CustomUserDetailsService , CustomUserDetails 를 만들어 아이디에 맞는 유저를 찾아 권한을 주는 작업을 마쳤다면,
다음과정은 실질적인 인증이다. 즉 , AuthenticationProvider를 구현하여 앞서 구현했던 CustomUserDetailsService, CustomUserDetails 와 같이 동작하게끔 하는 과정이다.
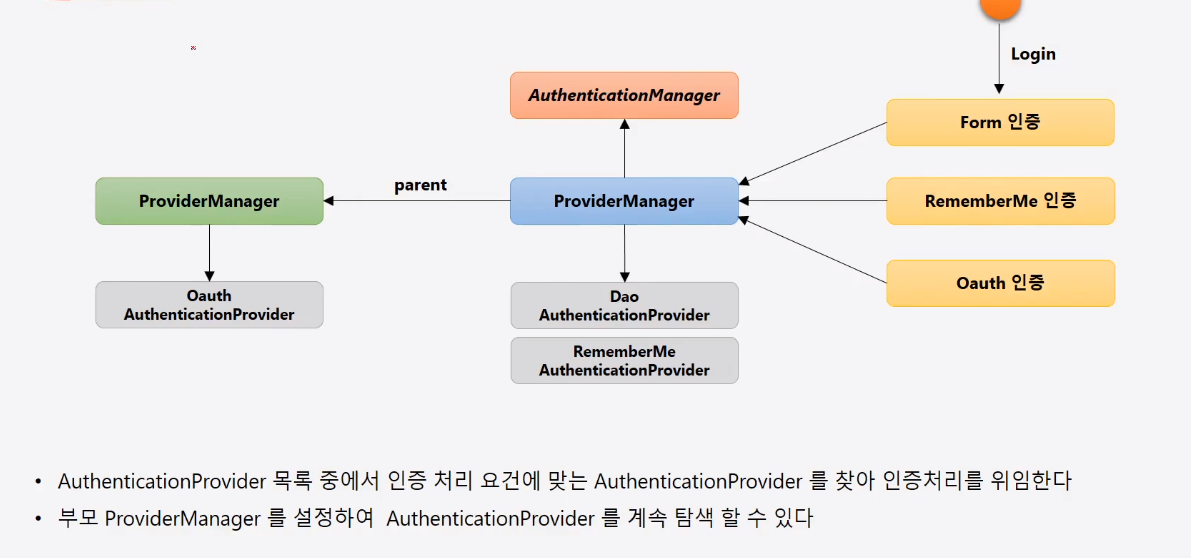
실질적 인증을 위해 필요한 것은 구현객체 생성과, 등록이다.
AuthenticationProvider 구현
앞서 필요했던 PasswordEncoder , UserDetailsService 를 주입받았다.
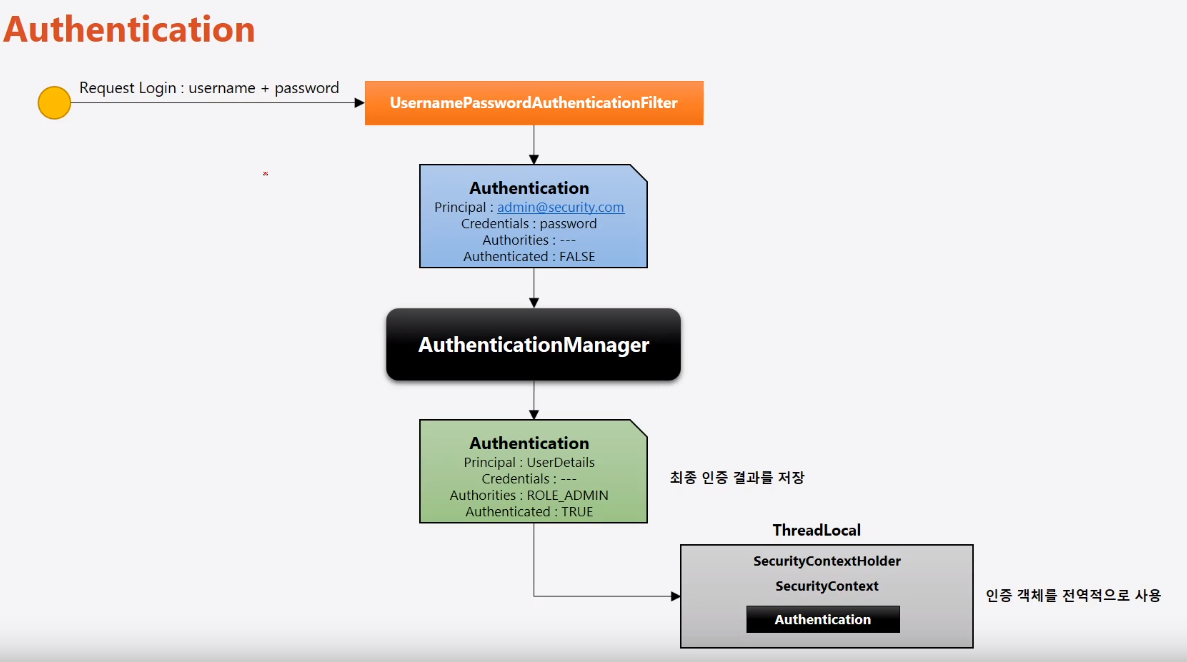
- Authentication authenticate : 실질적 인증과정을 구현
- boolean supports : 해당 Authentication 객체가 인증을 위한 토큰(UsernamePasswordAuthenticationToken) 타입인지 검사
- 넘겨받은 Authentication(파라메터) 객체에서 Getter 로 name 과 credential(암호) 를 추출.
- CustomUserDetailsService 를 이용하여 id 에 맞는 유저가 있는지 확인하고 권한, 유저정보를 저장한 CustomUserDetails 객체를 받아왔다.
- PasswordEncoder 를 이용하여 패스워드를 비교한다. 알맞지 않다면 BadCredentialException
- 패스워드 검증이 완료되었다면 UsernamePasswordAuthenticationToken 객체를 생성한다. 눈 여겨 볼 점은 생성시 생성자 매개값이다.
public UsernamePasswordAuthenticationToken(Object principal, Object credentials
Collection<? extends GrantedAuthority> authorities) 의 3개의 매개 값을 갖는다. principal 은 유저 정보를 가지고 있으며, credential 은 암호, authorites 는 권한 정보를 받는다.
- AuthenticationManager 에게 UsernamePasswordAuthenticationToken을 넘긴다.
import com.example.securityapp.security.service.AccountContext;
import org.springframework.beans.factory.annotation.Autowired;
import org.springframework.security.authentication.AuthenticationProvider;
import org.springframework.security.authentication.BadCredentialsException;
import org.springframework.security.authentication.UsernamePasswordAuthenticationToken;
import org.springframework.security.core.Authentication;
import org.springframework.security.core.AuthenticationException;
import org.springframework.security.core.userdetails.UserDetailsService;
import org.springframework.security.crypto.password.PasswordEncoder;


public class CustomAuthenticationProvider implements AuthenticationProvider {//실질적으로 인증처리를 하는 AuntheticationProvider 구현

    @Autowired
    private UserDetailsService userDetailsService;//유저 정보를 끌어오는 클래스

    @Autowired
    PasswordEncoder passwordEncoder; // 패스워드 검증위한 인코더

    @Override
    public Authentication authenticate(Authentication authentication) throws AuthenticationException {//검증의 로직
        //authentication 객체는 입력한 username, password 를 담고 있다.
        String username = authentication.getName(); // username 추출
        String password = (String)authentication.getCredentials(); // password 는 credentical 에 저장되어 있음.

        AccountContext accountContext = (AccountContext)userDetailsService.loadUserByUsername(username);// 원하는 UserDetails 로 캐스팅

        if(!passwordEncoder.matches(password, accountContext.getPassword())){// 사용자 암호와 저장된 암호화된 정보를 비교
            throw new BadCredentialsException("BadCredentialsException");
        }

        //principal : 유저정보 credentials : 암호 athorities : 권한정보 . 즉 최종 인증 토큰 생성 과정
        UsernamePasswordAuthenticationToken usernamePasswordAuthenticationToken =
                new UsernamePasswordAuthenticationToken(accountContext.getAccount(), null,accountContext.getAuthorities());

        return usernamePasswordAuthenticationToken;//AuthenticationManager 에게 리턴
    }

    @Override
    public boolean supports(Class<?> authentication) {//authentication 객체가 사용하려고하는 Token과 일치하는지 확인
        return UsernamePasswordAuthenticationToken.class.isAssignableFrom(authentication);
    }
}
CustomAuthenticationProvider 의 등록
마찬가지로, Spring Security 설정클래스에서 한다.
기존에 있던 CustomUserDetailsService 등록은사라졌다.
CustomAuthenticationProvider 에서 주입받아 사용 중이다. 물론 스프링 관리하에 있어야하기에 CustomUserAthenticationProvider 나 CustomUserDetailsService 는 Spring Bean 이여야 한다.
@Override
    protected void configure(AuthenticationManagerBuilder auth) throws Exception {

        auth.authenticationProvider(authenticationProvider());//빈 객체를 만들어 전달
    }

    @Bean
    public AuthenticationProvider authenticationProvider() { // 직접 구현한 AuthenticationProvider
        return new CustomAuthenticationProvider();
}'springframework > 시작하자SpringSecurity' 카테고리의 다른 글
| 29.Logout 화면과 보안처리 (0) | 2020.09.28 |
|---|---|
| 28.CustonLoginPage (0) | 2020.09.28 |
| 26.인증 프로세스 구현, CutonUserDetailsService (0) | 2020.09.27 |
| 26.PasswordEncoder (0) | 2020.09.27 |
| 25.정적 자원 관리 - WebIgnore 설정 (0) | 2020.09.27 |